

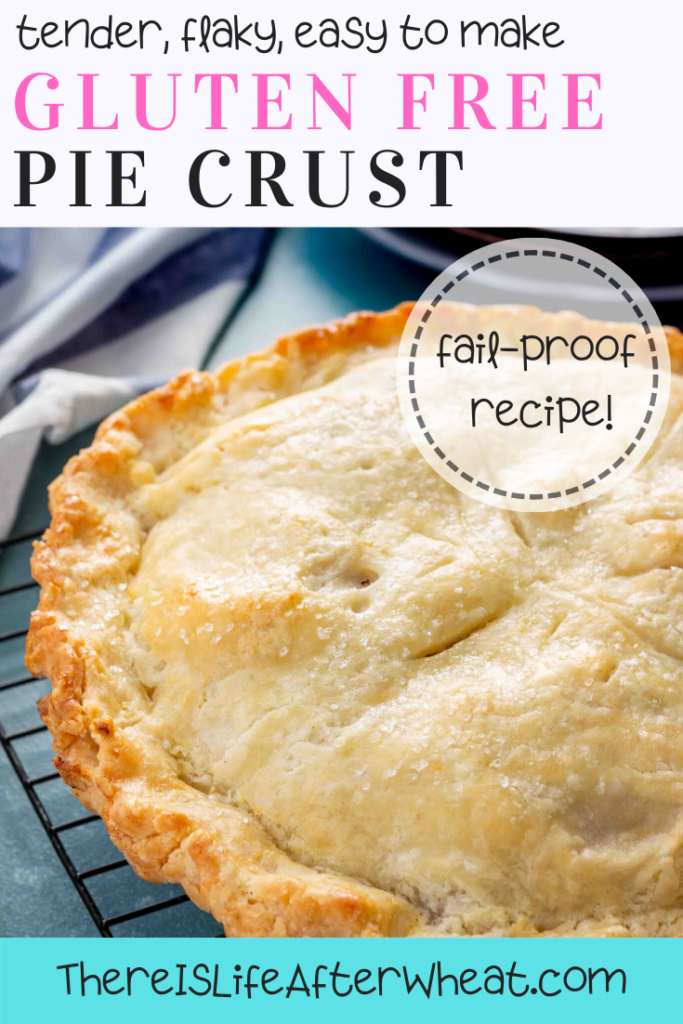
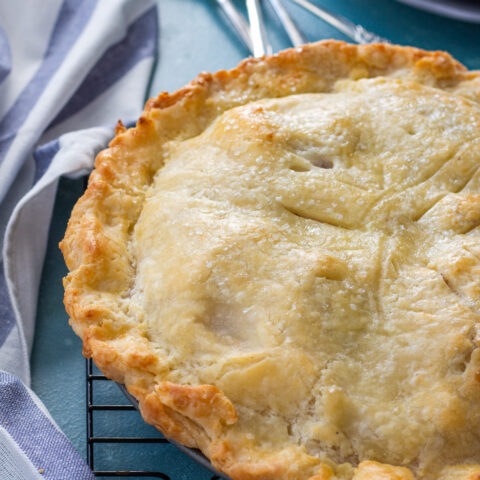
Your search for the perfect gluten free pie crust recipe ends here! This no-fail recipe is surprisingly easy to make and makes a perfectly flaky pie crust. Works with most gluten-free flour blends so you don't have to buy anything special.
Updated 8.15.2023
Pie crust is an ever-elusive art, and finding a gluten-free pie crust that even comes close to flaky can be a daunting task!
For the past seven years, I've been attempting to crack the code, and I'm happy to announce that this recipe is not only gluten free, it's also one of the flakiest pie crusts I've ever had!
I have to admit I'm a bit of a pie snob...
I spent a lot of Thanksgivings at my aunt's house where she made more pies than there were people.
Of course, my aunt made regular pie crust with wheat flour, so I watched and listened to her techniques in order to apply them to a gf pie crust recipe to make one that is flaky, tender, and, well, perfect.
I am so excited to share everything I've learned with you!
WAIT! Don't lose this post! Save this image on Pinterest
Why You'll Love This Recipe
I know that once you make this recipe, you'll never go back to any other. Here's what makes this the best gluten-free pie crust:
- No pastry cutter or grating the butter. Yep, you read that right! You can use a stand mixer or a food processor which means less time and effort on your part (high five!)
- Simple ingredients and works with pretty much any gluten-free all purpose flour blend so you don't have to go out and buy anything crazy or spend time mixing flours (unless you want to)
- Easy for everyone. Whether this is your first time making pie crust or you're a pie connoisseur, this recipe will work for you!
Tips for Making FLAKY Gluten-Free Pie Crust
There are a few simple tips that will help you make a flaky pie crust every time:
- Don't over-mix. You should have bits of butter in varying sizes throughout the dough. This is what creates pockets of air and makes the gluten free pie crust flaky.
- Use cold butter. Starting with cold butter means the butter will melt while baking, creating that tender and flaky crust you're going for!
- refrigerate the dough. This keeps the butter cold right up until the pie crust goes in the oven.
- Get a pie crust bag. This is one of my favorite kitchen tools! It makes it so easy to roll out pie crust without all the mess and hassle or overworking the dough. I also use my pie crust bag for making gluten free crescent rolls. You can also use parchment paper or plastic wrap.
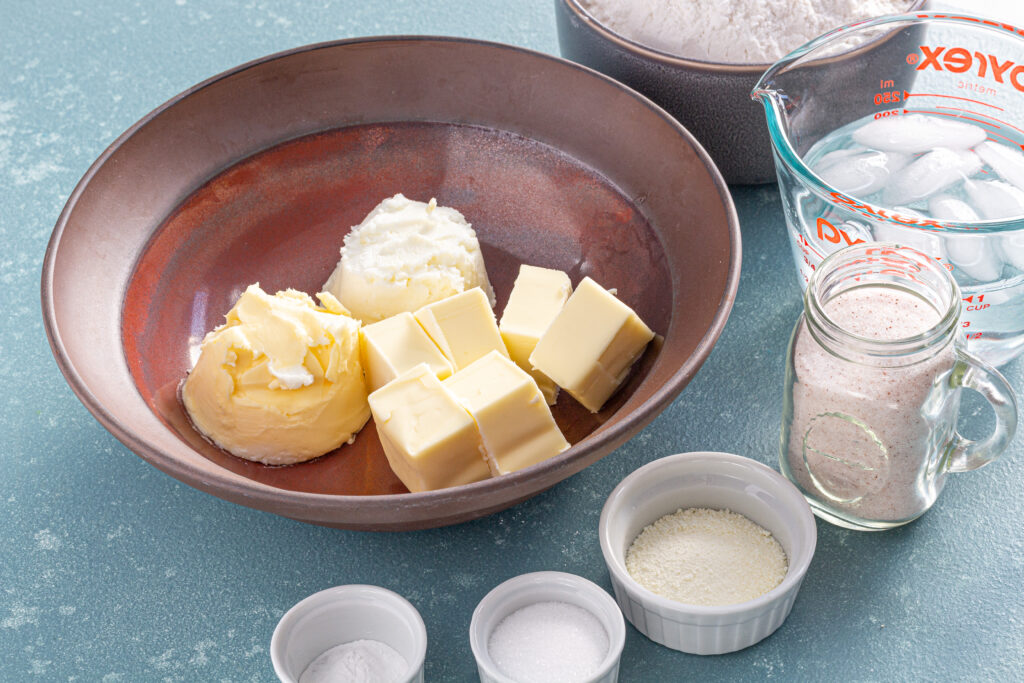
Ingredients in Gluten Free Pie Crust
This recipe uses just a few simple ingredients. Amounts and full instructions can be found in the recipe card below.
salted butter - it should be fresh out of the fridge to make those flaky layers
shortening - I like using butter flavored shortening for a richer flavor
sugar
baking powder - this is a bit unusual, but it's a tip from pastry chef Nick Malgieri that helps the pie crust expand in the pan instead of creeping down the sides.
salt
Instant powdered milk - gluten-free flours don't brown as well, so powdered milk gives the crust a golden appearance and also helps provide a richer flavor.
gluten-free flour blend - Just about any blend will work, but see below for my recommendations
ice-cold water - temp is key! You want your water to be nice and cold to help with a flaky texture.
egg - this is not mixed into the dough, so it can be left out if you're egg free. I always do an egg wash because it makes a beautiful, golden brown crust!
Best Gluten-Free Flour for Pie Crust
Gluten-free flour blends vary widely in their performance so it's important to select the right one when making a gluten-free pie crust recipe. Cup4Cup and Better Batter all purpose flour blends tend to work best in pie crust recipes, providing a flaky texture without grittiness.
That being said, this is a versatile recipe that I've tested successfully with many gluten-free flour blends. Here are a few tips to ensure your success:
- Use an all purpose flour blend, not a single gluten-free flour such as rice or almond flour.
- While I prefer Cup4Cup or Better Batter, I've also used gfJules, Bob's Red Mill 1:1, and King Arthur Measure for Measure with great results.
- Always use the stir, scoop, and level method when measuring your flour to ensure you're adding the correct amount. Too much flour in pie crust makes it tough and, for gluten-free, gritty.
- If you're making your own flour blend or using one without xanthan gum, add ¾ teaspoon xanthan gum to this recipe
How to Make Gluten-Free Pie Crust
I love this easy gluten-free pie crust recipe because you don't have to mix the ingredients with a pastry blender or by hand - you can use your stand mixer or food processor!
Here's how you make homemade gluten-free pie crust (see the corresponding pictures below)
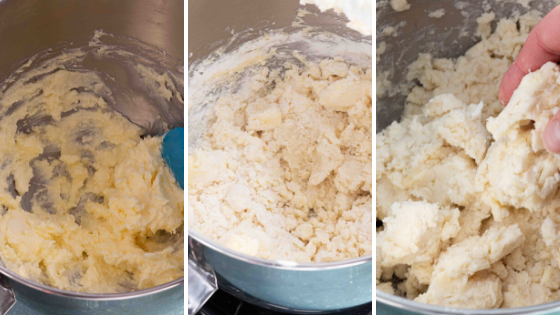
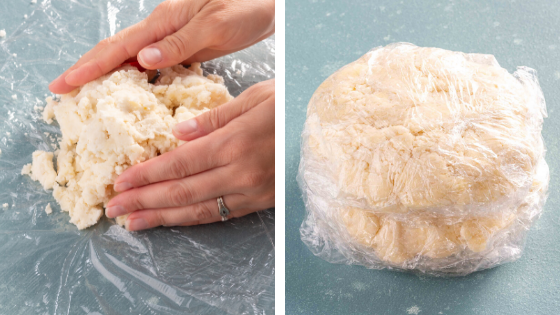
Briefly cream the fats together - you'll want to have pieces of cold butter throughout so don't over mix. (see left photo)
Add dry ingredients: salt, instant dry milk, sugar, baking powder, and part of the flour. Use the lowest setting of your stand mixer to stir it together. (see middle photo)
Add remaining flour and ice cold water, and stir together just until combined. You can see from the picture on the right that the pie crust dough will be a little chunky and not a smooth and uniform like cookie dough. It should be fairly sticky.
Divide the pie dough in half being careful not to overwork the dough
Place a piece of plastic wrap on the counter and set half of the dough on top. It will be loose instead of a solid dough ball and that's how you want it. Just gently press it together enough for it to form a disc and seal all the way around with the plastic wrap.
As you can see, the gluten-free pie dough is still kind of chunky and not smooth and cohesive. That's what makes the flaky layers!
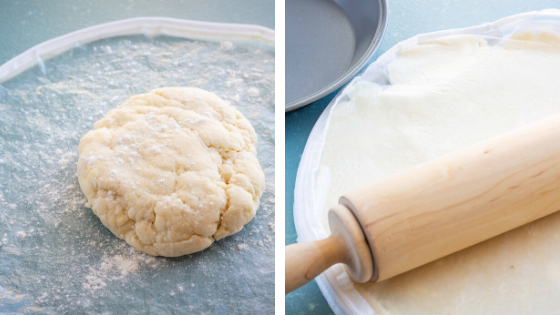
Refrigerate dough for 30-60 minutes.
Preheat your oven, and roll out the pie crust - I love using a pie crust bag for this step They are inexpensive and make it so much easier to make gluten-free pie crusts!
Only take out one dough disc at a time, keeping the other one cold in the fridge.
You can use a pie crust bag, or place the pie dough between 2 pieces of parchment paper or plastic wrap. Dust it lightly with gluten free flour before rolling into a circle with a rolling pin.
PRO TIP: If using a wooden rolling pin, be sure it's never come into contact with gluten as wood is porous
To easily transfer your dough to the pie pan, invert pie pan on top of the rolled out dough, gently slide a hand underneath, and quickly flip it over.
Be careful not to stretch the dough as you fit it in the pan, as this will lead to shrinkage and/or holes in your crust.
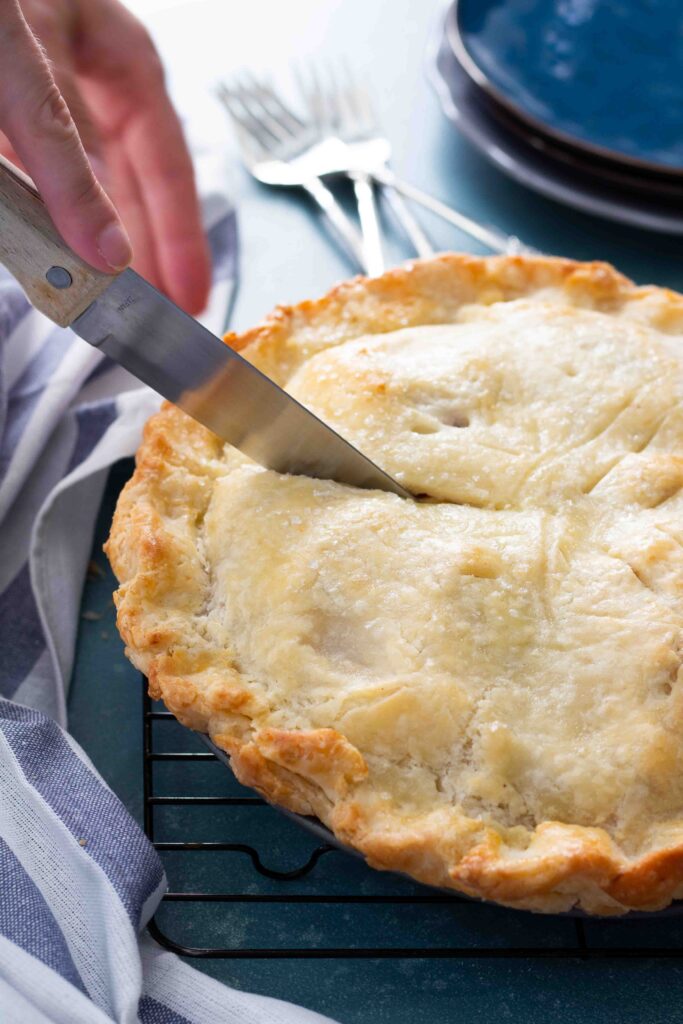
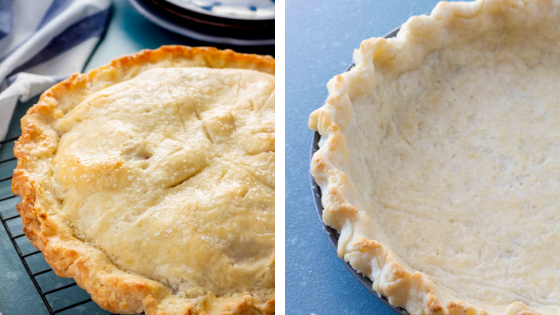
Can you spot the chunks of butter in the finished crust?

Make a Single or Double-Crust Pie
This recipe makes a 2 pie crusts, enough for 2 single-crust pies or 1 double-crust pie.
This pie crust works great for savory pies, apple pie, pumpkin pie, or with your other favorite pie filling!
To make a single gluten-free crust:
- Invert a single dough disc into a pie dish.
- Trim the edges and crimp using your fingers or a fork.
- Prick with a fork 2-3 times.
- Brush with egg wash or heavy cream.
- Use pie weights to prevent your crust from shrinking as it bakes.
- Blind bake for 14-17 minutes. It will not brown as much as a double-crust pie.
Try this single-crust recipe with a Cocoa Pecan Pie!
To make a double crust pie:
- Roll out bottom crust and invert onto a pie plate.
- Fill with desired pie filling
- Roll out second disc and invert onto top of pie.
- Seal and flute the edges using your fingers or a fork.
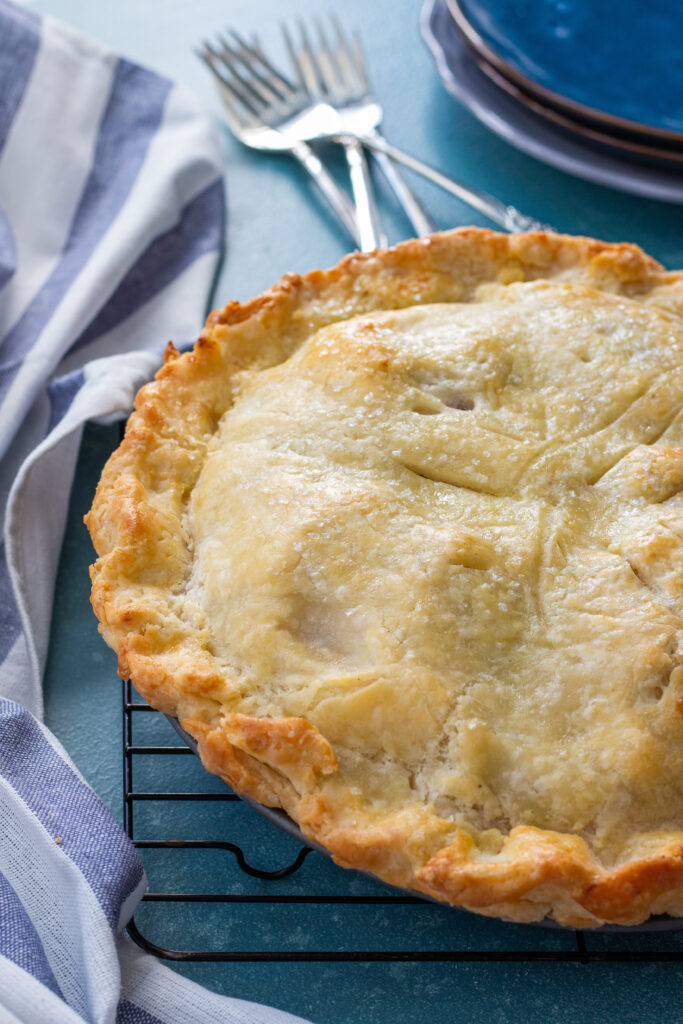
- Cut a few slits in the top crust to release steam, then brush with an egg wash or heavy cream.
- Sprinkle with sparkling sugar or regular white sugar, and bake according to recipe directions, usually 50-60 minutes.
Pro Tips for Pies
- Level up a chocolate cream pie by sprinkling a handful of milk chocolate chips on the crust as soon as it comes out of the oven. Once they've melted, use a pastry brush to spread it in a thin layer over the crust.
Cool completely and allow the chocolate to harden before filling with chocolate pudding - this will create a barrier that will keep the crust from getting soggy, and add another element of flavor and texture to your pie!
I recommend milk chocolate chips because a darker variety will make chocolate layer harder to cut through. - Always use an egg wash for single or double-crusted pies. Brushing the dough with an egg wash before baking gives it a beautiful golden brown hue and adds to the flakiness. If you can't do eggs, you can substitute heavy cream.
- Sprinkle sparkling sugar on top of a double-crusted pie before baking to give it a beautiful finish and delightful crunch
- Always allow the pie to cool completely before serving. I know, I know, it's hard to wait! But the crust and filling will be at their best when cool.
Can I Make this Gluten Free Pie Crust Recipe Dairy Free?
Using 3 different types of fat in the recipe is what gives this crust lift and flakiness so I definitely recommend sticking to the original recipe if you can.
If you need a dairy-free option, you can use only shortening or a combination of vegan shortening and vegan butter. Be sure to use dairy-free butter in stick form-my favorite for taste and texture is Melt brand.
If you're looking for more dairy free pies, this gluten free pecan pie is a great recipe!
MAKING THIS RECIPE??? We would love to see what you create with pie crust! Snap a photo, and tag @LifeAfterWheat on social media – we love seeing what you make!
Favorite Pie Recipes
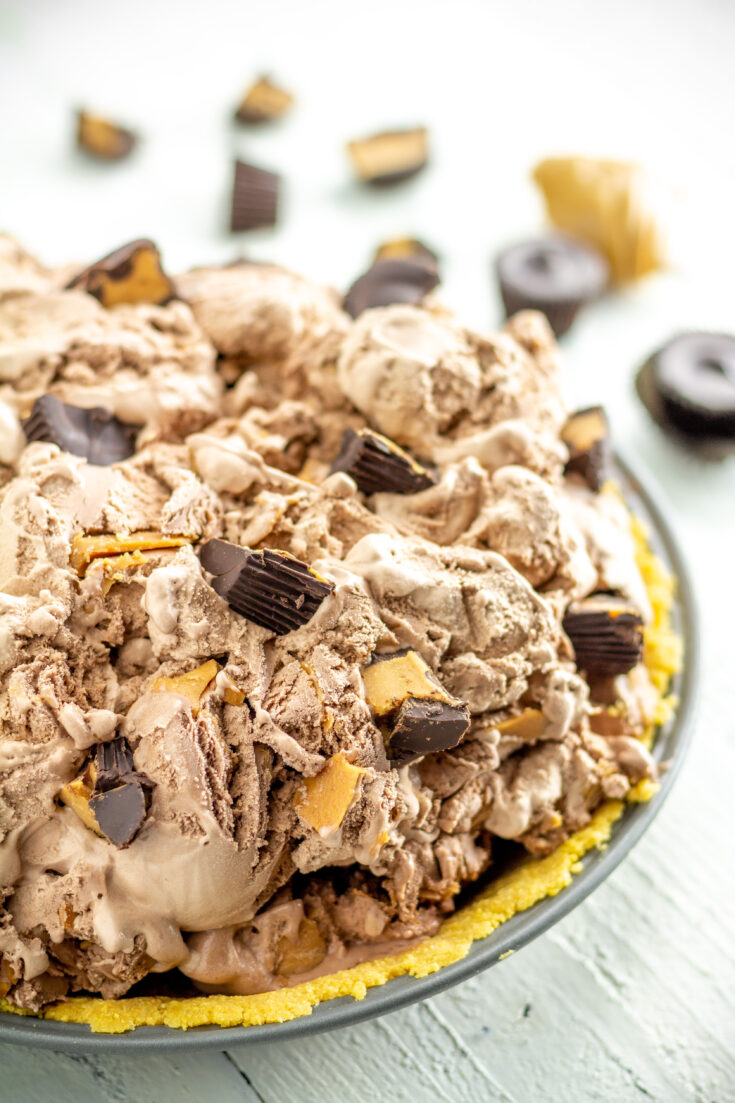
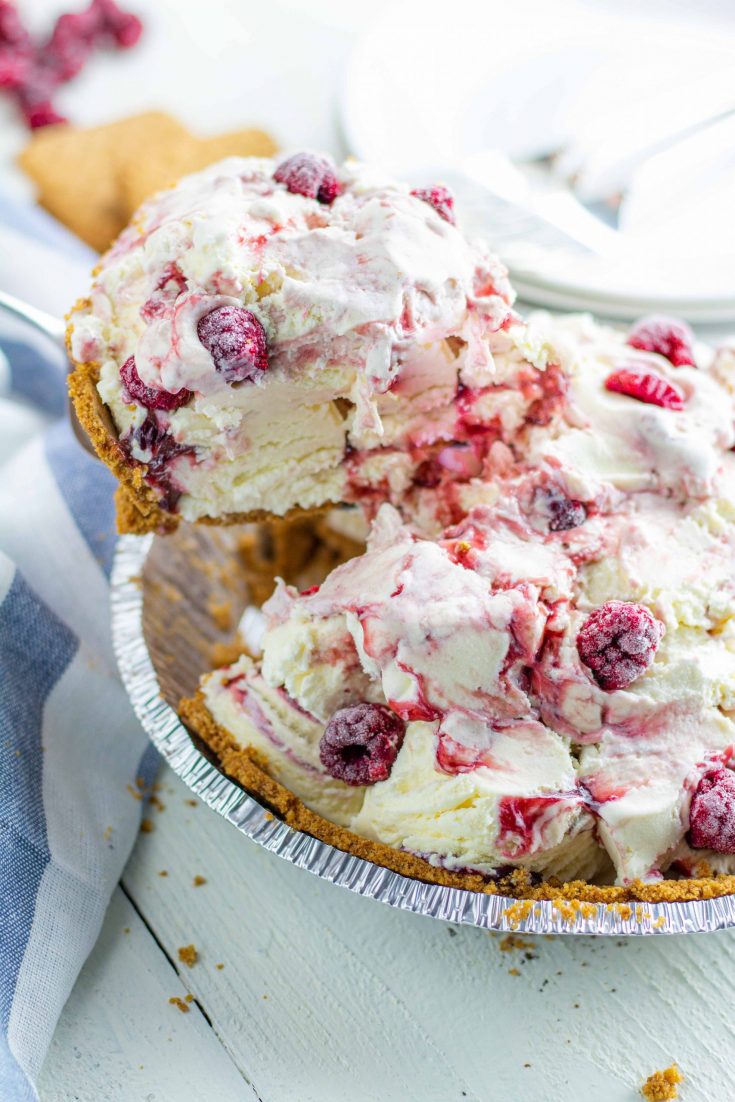
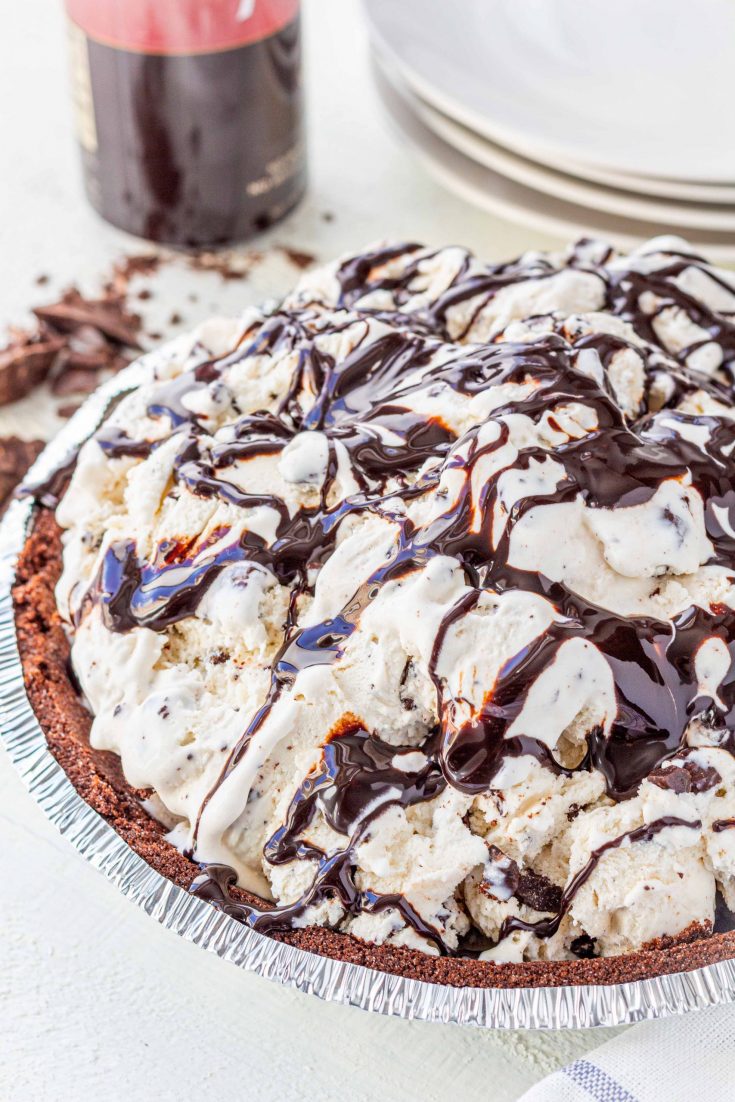
Check out my fun, quick, and EASY Gluten Free Ice Cream Pies!
Gluten Free Pie Crust Recipe
Here's the printable recipe, I hope you enjoy it! If you have any questions along the way, you can leave a comment on this post or reach out to @LifeAfterWheat on social media.
Happy baking!
Gluten Free Pie Crust
https://thereislifeafterwheat.comIngredients
- ½ cup salted butter - cold & cut into 8 pieces
- ⅓ cup shortening I used spectrum
- ⅓ cup butter-flavored Crisco shortening
- 1 T sugar
- ½ teaspoon baking powder
- 1 teaspoon salt
- 1 Tablespoon dry milk
- 2 ¾ cup high quality gluten free flour - divided see notes
- ⅔ cup ice-cold water
- 1 Egg for egg wash optional
Equipment
Method
- In bowl of stand mixer (see notes for other options), combine cold butter and shortenings. Mix on medium speed for 30 seconds. It should be fairly creamy with pieces of butter throughout.
- Add sugar, baking powder, salt, dry milk, and 1 ½ cups flour (see notes for measuring tips!) and stir (I use stir speed on Kitchen Aid stand mixer) for 10 seconds.
- Add remaining 1 ¼ cups gluten free flour and ⅔ cup ice cold water (see notes) and mix just until combined. Don't expect the dough to be smooth and solid like cookie dough, it should be a little choppy because you don't want to over-mix it. See the step-by-step pictures in the post for reference. If the dough seems too dry, add a tablespoon of water.
- Lay out a sheet of plastic wrap and pat half the dough together into a ball, then wrap tightly in plastic wrap. Repeat with the other half and refrigerate the dough for 30-60 minutes.
- When ready to bake, preheat oven to 375 degrees F.
- Remove one disc of dough and roll it out into a circle larger than your pie plate (I use a 14" pie crust bag for this) You'll want to dust your surface with gluten free flour, but just a little - 1 tablespoon ought to do.
- Invert pie crust onto pie plate and poke with a fork 2-3 times.
- Whisk egg and brush onto pie crust. You won't need much of the egg, but brushing a little on will give your crust a beautiful, golden color and crispy edges.
- Bake single pie crust for 14-17 minutes.
- For double-crust pie, fill with desired filling, roll out second disc and invert onto top of pie. Seal and flute the edges, cut a few slits to release steam, then brush the top with egg wash. Sprinkle with sparkling sugar or regular white sugar, and bake according to recipe directions, usually 50-60 minutes.
Nutrition
Notes
- Flour matters. Gluten free flour blends are all different, so I suggest using a high-quality blend that you have had success with in other finicky recipes like cookies or rolls. I prefer Better Batter all-purpose gluten free flour when making this recipe, but Bob's Red Mill 1:1 (not the bean-based) works great as well!
- To measure flour: Stir the flour, scoop into measuring cup, and level off with the flat side of a knife. This will ensure you aren't adding too much flour to the recipe.
- Don't over-mix. You should have bits of butter in varying sizes throughout the dough. This is what creates pockets of air and makes the pie crust flaky.
- Use cold butter and refrigerate the dough. Starting with cold butter means the butter will melt while baking, creating that tender and flaky crust you're going for! You only need to refrigerate the dough for 30-60 minutes.
- Get a pie crust bag. This is one of my favorite kitchen tools! It makes it so easy to roll out pie crust without all the mess and hassle. I also use my pie crust bag for making gluten free crescent rolls.
- You can make pie crust ahead of time. To make pie crust ahead of time, prepare the dough as directed and wrap tightly in plastic wrap. Store in the fridge up to 2 days, and let sit at room temp for 10-20 minutes before rolling out so it will be easier to handle.
- If you don't have a stand mixer, you can use a large bowl and hand mixer. You can also use a wooden spoon (or other sturdy spoon) to cream the butter and the do the rest by hand.
- Use ice water. Add a handful of ice cubes to about a cup of water, let it sit for a few minutes so the water gets nice and cold, then measure your ⅔ cup from there.


Jen says
This is a must-make for Thanksgiving!
thereislifeafterwheat@gmail.com says
Yes!
Cecilia hudes says
Can I freeze the pie crusts
thereislifeafterwheat@gmail.com says
Yes, they freeze well!
Denise says
Would you have a recommendation if a person needed to leave out the Crisco?
thereislifeafterwheat@gmail.com says
You can substitute spectrum shortening or even additional butter if needed.
Jacquie says
I am curious as to why the 2 different shortenings...would it work to just use spectrum? I try to always avoid using Crisco.
thereislifeafterwheat@gmail.com says
They behave a little differently, but you can use spectrum instead of the Crisco.
Callie Walker says
I'm going to try this today! I'm so excited. Question: is the 14-17 minutes bake time for blind baking? Is that necessary for this recipe? I've never blind baked my crusts for pumpkin or pecan pies, but do you recommend doing so with this crust?
thereislifeafterwheat@gmail.com says
The cook time is for blind baking, which you only need to do if you are using a chilled filling like for a cream pie. No need to blind bake for pumpkin or pecan 🙂
Ana says
If I only use butter for the crust, how much butter should I use?
thereislifeafterwheat@gmail.com says
You can sub it for the same amount of shortening.
Mary Stubrich says
Can I sub coconut oil for the butter or crisco?
thereislifeafterwheat@gmail.com says
Hi mary, I haven't tried that yet so I'm not sure. If you give it a go, please let me know how it works!
Ashley says
So I have to say that out of the whole 6 years that I’ve been gluten free, that is is by far the best crust that I’ve ever made and or tasted! My whole family loved it including my two toddlers! Thank you so much for sharing your recipe! I posted your link in some groups of mine and everyone else seems just as exciting as I am!
Amazing job. ❤️❤️
thereislifeafterwheat@gmail.com says
Ashley thank you so much, you just made my day! I so appreciate you sharing. XO Celeste
Sara says
@Ashley, which flour did you use?
Kathy jean says
Have you made this with gum free better batter flour?
thereislifeafterwheat@gmail.com says
I haven't tested their gum free flour yet, if you do then please let me know how it goes!
Danielle Groom says
THANK YOU!!! I have tried for years to make a good gf pie crust, last year I swore I was done. But I was craving an apple pie, so I came in search of yet another recipe to try.....this was the one!!! The pie crust bag is genius, it made this so much easier (and kept me from cussing at the sticky dough). The crust came out DELICOUS....light and flakey 🙂
Next time I make it, the only thing I will change is putting the rolled out dough, in the bag, back in the fridge before I put it in the dish....mine was a little too warm and fell apart a little.
Thank you!!!!
thereislifeafterwheat@gmail.com says
Yay for tasty pie crusts! I'm so glad you enjoyed it, thanks for sharing your experience!
Katie says
The pictures even look better than other gf pie crusts I've seen, this is exciting! I'm planning on making some Thanksgiving dishes ahead of time and freezing them (save some of the hassle on the big day), do you think these crusts would freeze and thaw out well? Thanks!
thereislifeafterwheat@gmail.com says
I haven't tried it, but I think it would freeze well!
Monique says
Is it possible to omit the dry milk? Thanks!
thereislifeafterwheat@gmail.com says
It would probably be fine, but might not brown quite as much.
Dawnna Spinney says
Do you pre bake for an apple pie?
thereislifeafterwheat@gmail.com says
No, fill and bake for apple pie. You only need to pre-bake for refrigerated pies like cream pies.
Amadia says
I’d love to try this recipe. I can’t have dairy though, what would you suggest as a substitute for dry milk powder? I am also going to use all dairy free butter and see how it goes as I prefer that to shortening.
thereislifeafterwheat@gmail.com says
You can use coconut milk powder or just omit 🙂
Morgan says
I’m so excited to try this! My GF flour is high quality but does not have xanthum gum. Do you think I need it? If so how much would you suggest adding? Thanks!!
thereislifeafterwheat@gmail.com says
Depends on the flour blend you are using, I would try it with 1/4 teaspoon per cup of flour first...if it is too crumbly and doesn't hold together well then you can adjust to 1/2 teaspoon per cup of flour the next time.
Joan says
I can't find the actual recipe, with the ingredients list. for the pie crust! What am i doing wrong?
thereislifeafterwheat@gmail.com says
It is at the very bottom 🙂
Jeannie says
Hi, love your recipe. I am celiac with a dairy problem. Can I do this without the powder mill.
thereislifeafterwheat@gmail.com says
Yes, you can leave it out, or sub with powdered coconut milk 🙂 I'm so happy you're enjoying my recipes!
Karissa says
Can you freeze this pie crust?
thereislifeafterwheat@gmail.com says
Yep!
Cherie says
I made my first ever lemon meringue pie with a GF pre-made crust for Thanksgiving. It was very tasty but if I could make a flakey crust, it would be even better! I can't wait to try this recipe! And the tip on the pie crust bag is wonderful! I can't wait to get mine! Thank you for your tips and help.
thereislifeafterwheat@gmail.com says
So excited for you to try it! You'll love the pie crust bag. XO Celeste
Amanda says
Mine was very crumbly while rolling out. I hade to patch pretty much half of the crust once it was in the pie dish. I am thinking it was too dry. I will add more water next time. It’s in the oven right now. Hoping it tastes good.
thereislifeafterwheat@gmail.com says
The amount of water needed can vary depending on humidity levels and flour used, definitely add a little splash of water next time if it's too crumbly.
Shirley says
Well I made my first gluten free pastry apple pie and I have to say it was the best I've made. I cut my butter into small piece with a pastry cutter then added all the small ingredients and half the flour , then added the I cold water and proceeded as per the recipe. The pie turned out excellent and the crust was crispy , it was the best pie I've ever made. Thank you for the recipe
thereislifeafterwheat@gmail.com says
Yay! So glad you enjoyed it!
Sarra says
@Shirley, Did you use only butter or shortening also?
Joan Gonzales says
Love your recipes! Is there a way to only print out the recipe without the adds? thank you!
thereislifeafterwheat@gmail.com says
The ads appear on the print preview, but will not be printed. So happy to hear you're enjoying the recipes!
Alene says
If I already told you this, I apologize. I did try a gluten free blend recommended by The Loopy Whisk without rice flour, and it came out great! It actually worked. The blend has more tapioca flour than the other two whole grain flours. I made an apple pie, and it even tasted good! I was ecstatic because I thought a decent pie crust was gone to me with no rice flour. I do love your recipes and probably will try to convert them to rice free flour. Had a few failures with paleo recipes. Hope you have a lovely afternoon!
thereislifeafterwheat@gmail.com says
Yay! I'm so happy the rice free blend worked, I know many others also can't tolerate rice so I appreciate you coming back to share.
Mary J says
I can't use Crisco nor Spectrum. It has to be Palm oil free and preservative free. That leaves Butter or locally sourced lard.
Can you make a suggestion what to do with this recipe?
thereislifeafterwheat@gmail.com says
I have made this crust with all butter and it's delicious that way, too! It does tend to shrink a little more so be sure the crust is nice and cold before popping in the oven.
Lonna says
I am new to gluten free and loved this recipe because it can be made using my stand mixer. I love making new things and never give up when it doesn’t turn out quite right. Mistakes that I still need to work on: don’t overmix and make sure I use enough ice water. I thought the dough seemed to hold together pretty well without using all the water but found how wrong I was when trying to roll it out! Had a lot of patching to do but our tummies won’t know the difference! It was absolutely delicious (made a pecan pie) and will be even more better the next time I make it. Live and learn.
thereislifeafterwheat@gmail.com says
I'm so glad you enjoyed the pie crust Lonna! Thanks for sharing 🙂
Thelma Cadieux says
If I go with salted butter lactose free only, do I understand that I need 1/2 cup and then 1/3 cup and 1/3 cup of more butter. Please advise me as I want to bake this pie crust for quiches, lemon pie and my tourtieres at Christmas together with the apple pie.
Thank you for your guidance.
thereislifeafterwheat@gmail.com says
Yes, you got it:)
Sharon Anderson says
My first successful gluten free pastry. Everyone loved it.
thereislifeafterwheat@gmail.com says
Yay! Thanks for sharing, I'm so glad you enjoyed it.
Andrea says
Can you sub coconut milk powder for the dry milk powder to be milk free?
thereislifeafterwheat@gmail.com says
Yes, it works great.
Andrea says
Do you think you could sub dry coconut milk powder instead of dry milk powder??
Belinda G says
I made this crust for the holidays using Bob Red Mills 1:1 and this is now my favorite pie crust. It is light and flaky. Leftover dough freezes well.
Julie says
I'd love to make this recipe,
butter-flavored Crisco shortening is so expensive here in the UK. 😔
thereislifeafterwheat@gmail.com says
You can swap out any shortening or even butter. I've found that it shrinks a bit more with butter, so be sure it's extra cold before baking.
Gayle says
This is absolutely the best pie crust! I have been so discouraged after making many unsuccessful pie crusts since diagnosed with celiac disease several years ago. This crust looks amazing and tastes even better! I made a small hand pie with the leftover crust last week (from the edges) so today that is what I am making with the entire recipe. I have a jar of peaches that didn’t seal so it’s going to be peach hand pies. The first pie I made was a blueberry pie and I think it was as a good as the ones my “expert” grandmother used to make. That’s saying a lot!
Thanks so much for sharing!!!
Cate says
This pie crust looks amazing! Will it work for a savory pie as well? I was going to use it for a chicken pot pie. Should I omit the sugar? Any other changes for a savory crust?
thereislifeafterwheat@gmail.com says
Yes! I use it for chicken pot pie all the time, so good! You can use the recipe as written. Enoy!
Sara says
Has anyone tried this with Bob's Red Mil 1:1? Very hard to get a good gf flour here. The last gf pie crust I tried I had to warn people to maybe just eat the filling! It was so disappointing.
Celeste Noland says
I've used Bob's Red Mill, it's not my favorite of the ones I've used but the crust still comes out great! This really is a forgiving recipe, the only flour I wouldn't recommend is Namaste.
Kim says
Why two different shortenings? I only have crisco so can I use just that? TIA
Celeste Noland says
The variety creates the best texture. You can use just Crisco though, if you want.
Donna says
Excellent! Taste and texture are very good. I have used this for single and double crust pies as well as rustic fruit tarts.
Kay says
I made this crust and it turned out great. Can it be made a day or two ahead of time and left in the refrigerator?
Celeste Noland says
The texture is better fresh, but it does keep in the fridge for a few days.
Judy Vallas says
I'm having a problem with soggy bottoms on the otherwise beautiful crust (cherry pies with dough cutouts on top rather than top crust, 400° oven, countertop oven, top rack (there is no center rack), I did not par-bake (and that wouldn't help if it were a double crust pie)). I can't think what to change. What temperature do you bake yours at? Should I lower to 350° and maybe bake a long time, covering with foil at the end? Use my regular oven? Does anyone have any suggestions? Thanks! I really loved working with this dough.
Celeste Noland says
I don't have experience using a countertop oven but I would try using the bottom rack and keeping an eye on it, or par-baking the bottom crust for 10-15 minutes, then filling and topping and baking the remainder. You could also try using a regular oven.
Maga says
Is there any reason why you didn't use lard in place of the shortening? Much healthier.
Celeste Noland says
Feel free to use it if you want, I've just never used lard.
Abby Clark says
Can this be used for fried hand pies?
Celeste Noland says
I've made hand pies with this recipe, they turn out great!
Sara says
Can this also be made dairy free?
Celeste Noland says
Yes! Just sub dairy-free ingredients. It works great. I use powdered coconut milk in place of the instant milk.
Sara says
I'm getting a strange request for my email in order to unlock the print button. Is this normal?
Celeste Noland says
Yes, it allows you to set up an account so you can save my recipes and print them.
Rindy says
This is a wounderful tasting pie crust. This is the second time I have made this recipe. First for a 2 crust grape pie and the secdon for chicken pot pie. I used butter and 2/3 cup butter crisco as I did not have the Spectrum brand. It is a little hard to work with after rolling out but will work with it as it has great flavor. Thanks for sharing the recipe.
LCO says
Curious why two different types of shortenings. Can just crisco be used? Does it have to be butter flavored?
I want to try this recipe!
Celeste Noland says
I've tested it with all the variations and that's what works best, but it also works great with only one type of Crisco/shortening, or even as an all-butter crust.
Ashley says
I am shocked how well this recipe worked! I did a trial run for Thanksgiving and made a pot pie, I omitted the sugar and used the butter flavored crisco for all of the shortening. I did the first roll out with just a mat then tried my pie crust bag for the second one and that was a game changer! I am very happy with the recipe!
Celeste Noland says
Yay! So happy you enjoyed flaky pie crust!
Susan Cushing says
This is the best GF pie crust I have ever made! The flavor and texture is perfect! Thank you so much for sharing!
Shelly E says
Could powdered oat milk work? I can't have dairy.
Celeste Noland says
I haven't tried powdered oat milk, but I've used powdered coconut milk and that works great so I imagine oat milk would work as well. You can even leave it out, it just helps a bit with flavor and browning.
Kimberly says
This is the best gluten-free pie crust I have ever tasted! I made an apple pie for the July Fourth holiday, and it was a huge hit! I used King Arthur GF 1:1 flour and subbed 1/3 c butter and 1/3 cup Spectrum shortening for the Crisco. Thank you for the recipe!
Celeste Noland says
Love this! Thanks for letting me know!